Frequently Asked Questions
- Details
- By Brandon Newport
- Category: Frequently Asked Questions
- Hits: 1408
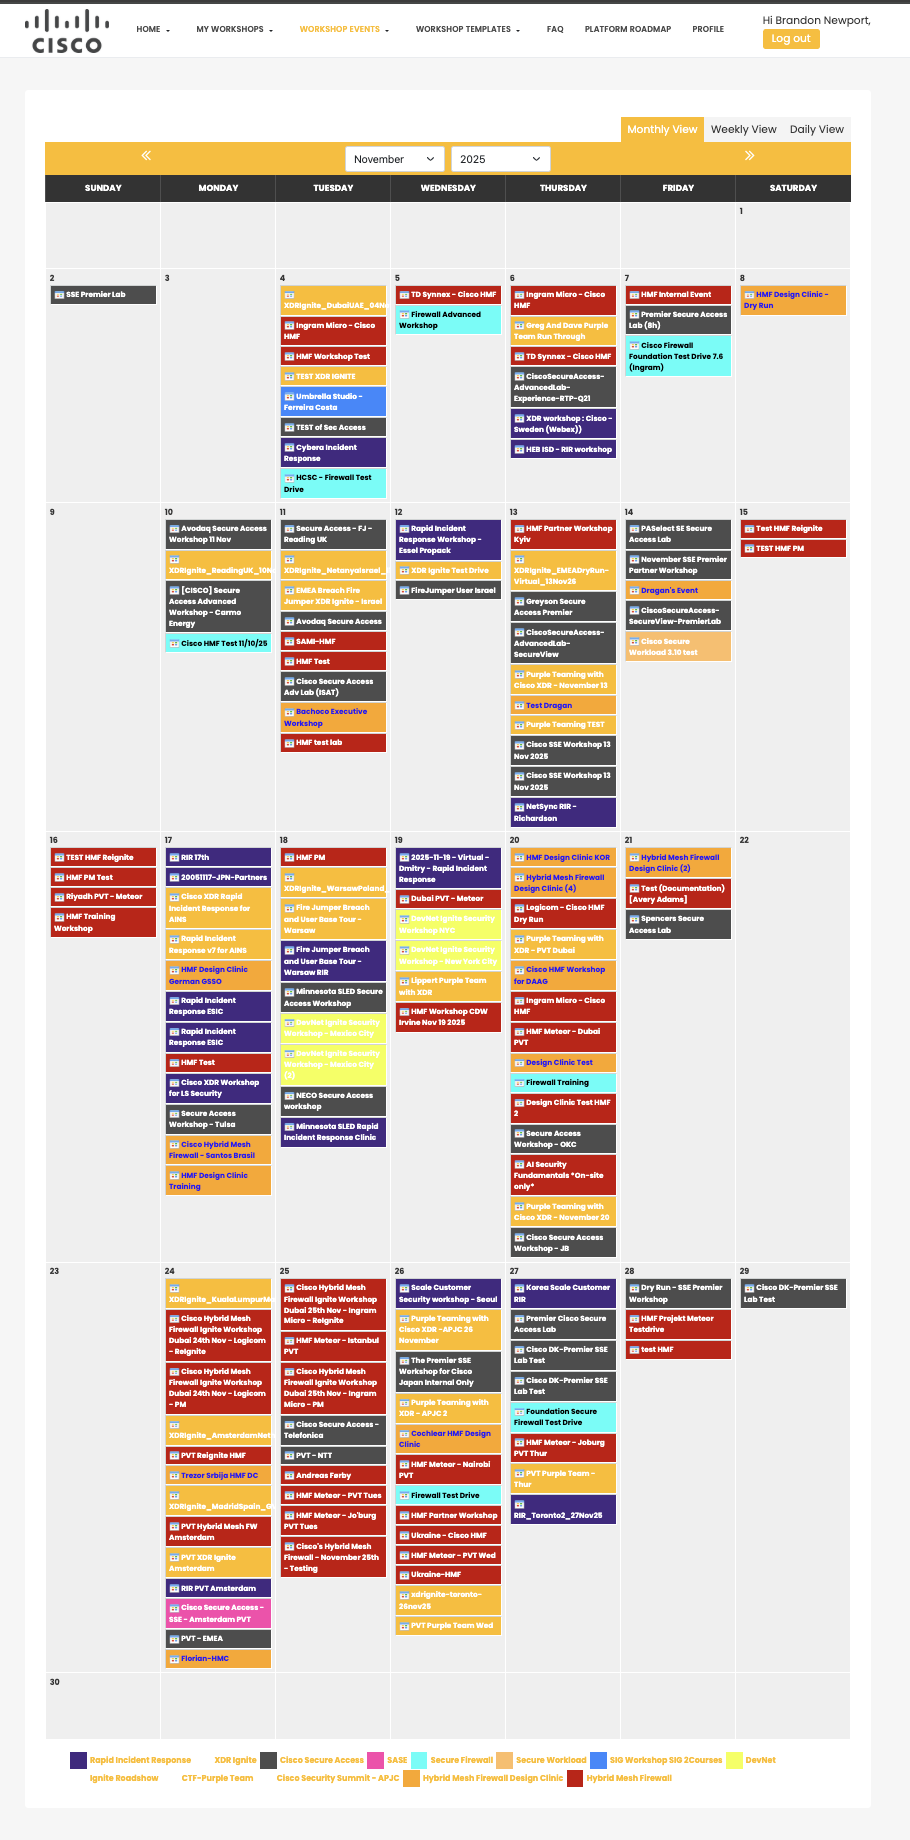
Events no longer disappear from the UI. We used to hide past events, but based on requests, we have turned that feature off. For example, this FAQ was updated on December 1st, 2025, and this is all the events from November 2025.
Other Related FAQs:
- How Do I Check-In Attendees to My Workshop Event?
- How to Sign Up for Workshops Yourself [Enrollment Keys]
- How Do I See My Survey Results?
- Will the Template Replace My Description?
- How Do I Invite Customers to My Workshop Event?
- Why Do I Need to Give a Presentation?
- Can I Change the Proctor for My Workshop Event?
- How Do I See Who Participated In My Workshop?
- Can We Have More Than One Proctor for Our Workshop?
- Can I Create a Private Event or Set Permissions on My Event?
- How Long Will It Take to Get Confirmation of My Workshop Event?
- What Happens to People on the Waitlist When My Event Is Full?
- How Can I Get Permission to Lead the Train the Trainer Sessions?
- How Can I Encourage Attendee Survey Completion?
- Details
- By Brandon Newport
- Category: Frequently Asked Questions
- Hits: 1709
You can invite customers through Outlook/Email, URLs, X, and LinkedIn!
This new platform offers multiple ways to invite customers to your workshop. This flexibility allows you to invite your customers in the easiest way for you. It also gives you the freedom to utilize social media to expand your potential audience and attract more people to your workshops. This how-to will cover several methods you can use to share your workshop events with others. I am sure there are other ways that folks will share with me, and I will update this page as that happens. There are also some social media platforms that I do not have or use, so I won't be able to explain how to use those.
Workshop Event Invite Options:

- Outlook Invitation - Email all your potential attendees the URL to your workshop using the email templates located here
- Share the URL for your workshop. Each workshop event in the system has a unique URL that can be copy shared out. This will take your invitees to the page describing your workshop and allow them to register (once they have an account on the system).
Note: This is the best method, as it allows you to create a more customized invite to each individual, and make it easier for them to respond directly to you if there's an issue. - Invite Friend - Clicking this button allows you to send an invite to several people at the same time.
- Click the Invite Friend button it will open a popup window
- In the first box on the right enter your invitees one per line
- In the second box enter each person from the first box email address again one per line
- Scroll down a bit and you can enter a message that you want sent out to each person
- Scroll down a little more and you can click the Invite button to send the invites to the people listed in the previous boxes
- Sharing via X Post - Click on the X Post button near the top right of your event and it will automatically open X (formally Twitter) in an new tab and fill in the X Post for your to share with your X Friends. Once you are in X you can just click on the Post button and your post will go out
- LinkedIn - With linked in you can post it your page like an X Post or you can message individuals directly.
- Click on the LinkedIn icon under the description
- Your LinkedIn account will open in a new tab and a popup window will display allowing you to post your workshop
- For more control over the post you can click the dropdown next your your profile picture in the top left...this will change the popup
- Now you can restrict, focus or open up who can see your workshop event post.
- If you make changes click the Done button, if not click the Back button
- You will be taken back to the original LinkedIn popup window about your post. When ready click the Post button in the bottom right of the popup.
Feel free to share instructions for other platforms!
Other Related FAQs:
- Who Can Proctor Workshop Events?
- How Do I Check-In Attendees to My Workshop Event?
- How Do I See My Survey Results?
- Will the Template Replace My Description?
- Why Do I Need to Give a Presentation?
- When Do Events Disappear from the Web UI?
- Can I Change the Proctor for My Workshop Event?
- How Do I See Who Participated In My Workshop?
- Can We Have More Than One Proctor for Our Workshop?
- Can I Create a Private Event or Set Permissions on My Event?
- How Long Will It Take to Get Confirmation of My Workshop Event?
- What Happens to People on the Waitlist When My Event Is Full?
- How Can I Encourage Attendee Survey Completion?
- Details
- By Brandon Newport
- Category: Frequently Asked Questions
- Hits: 1854
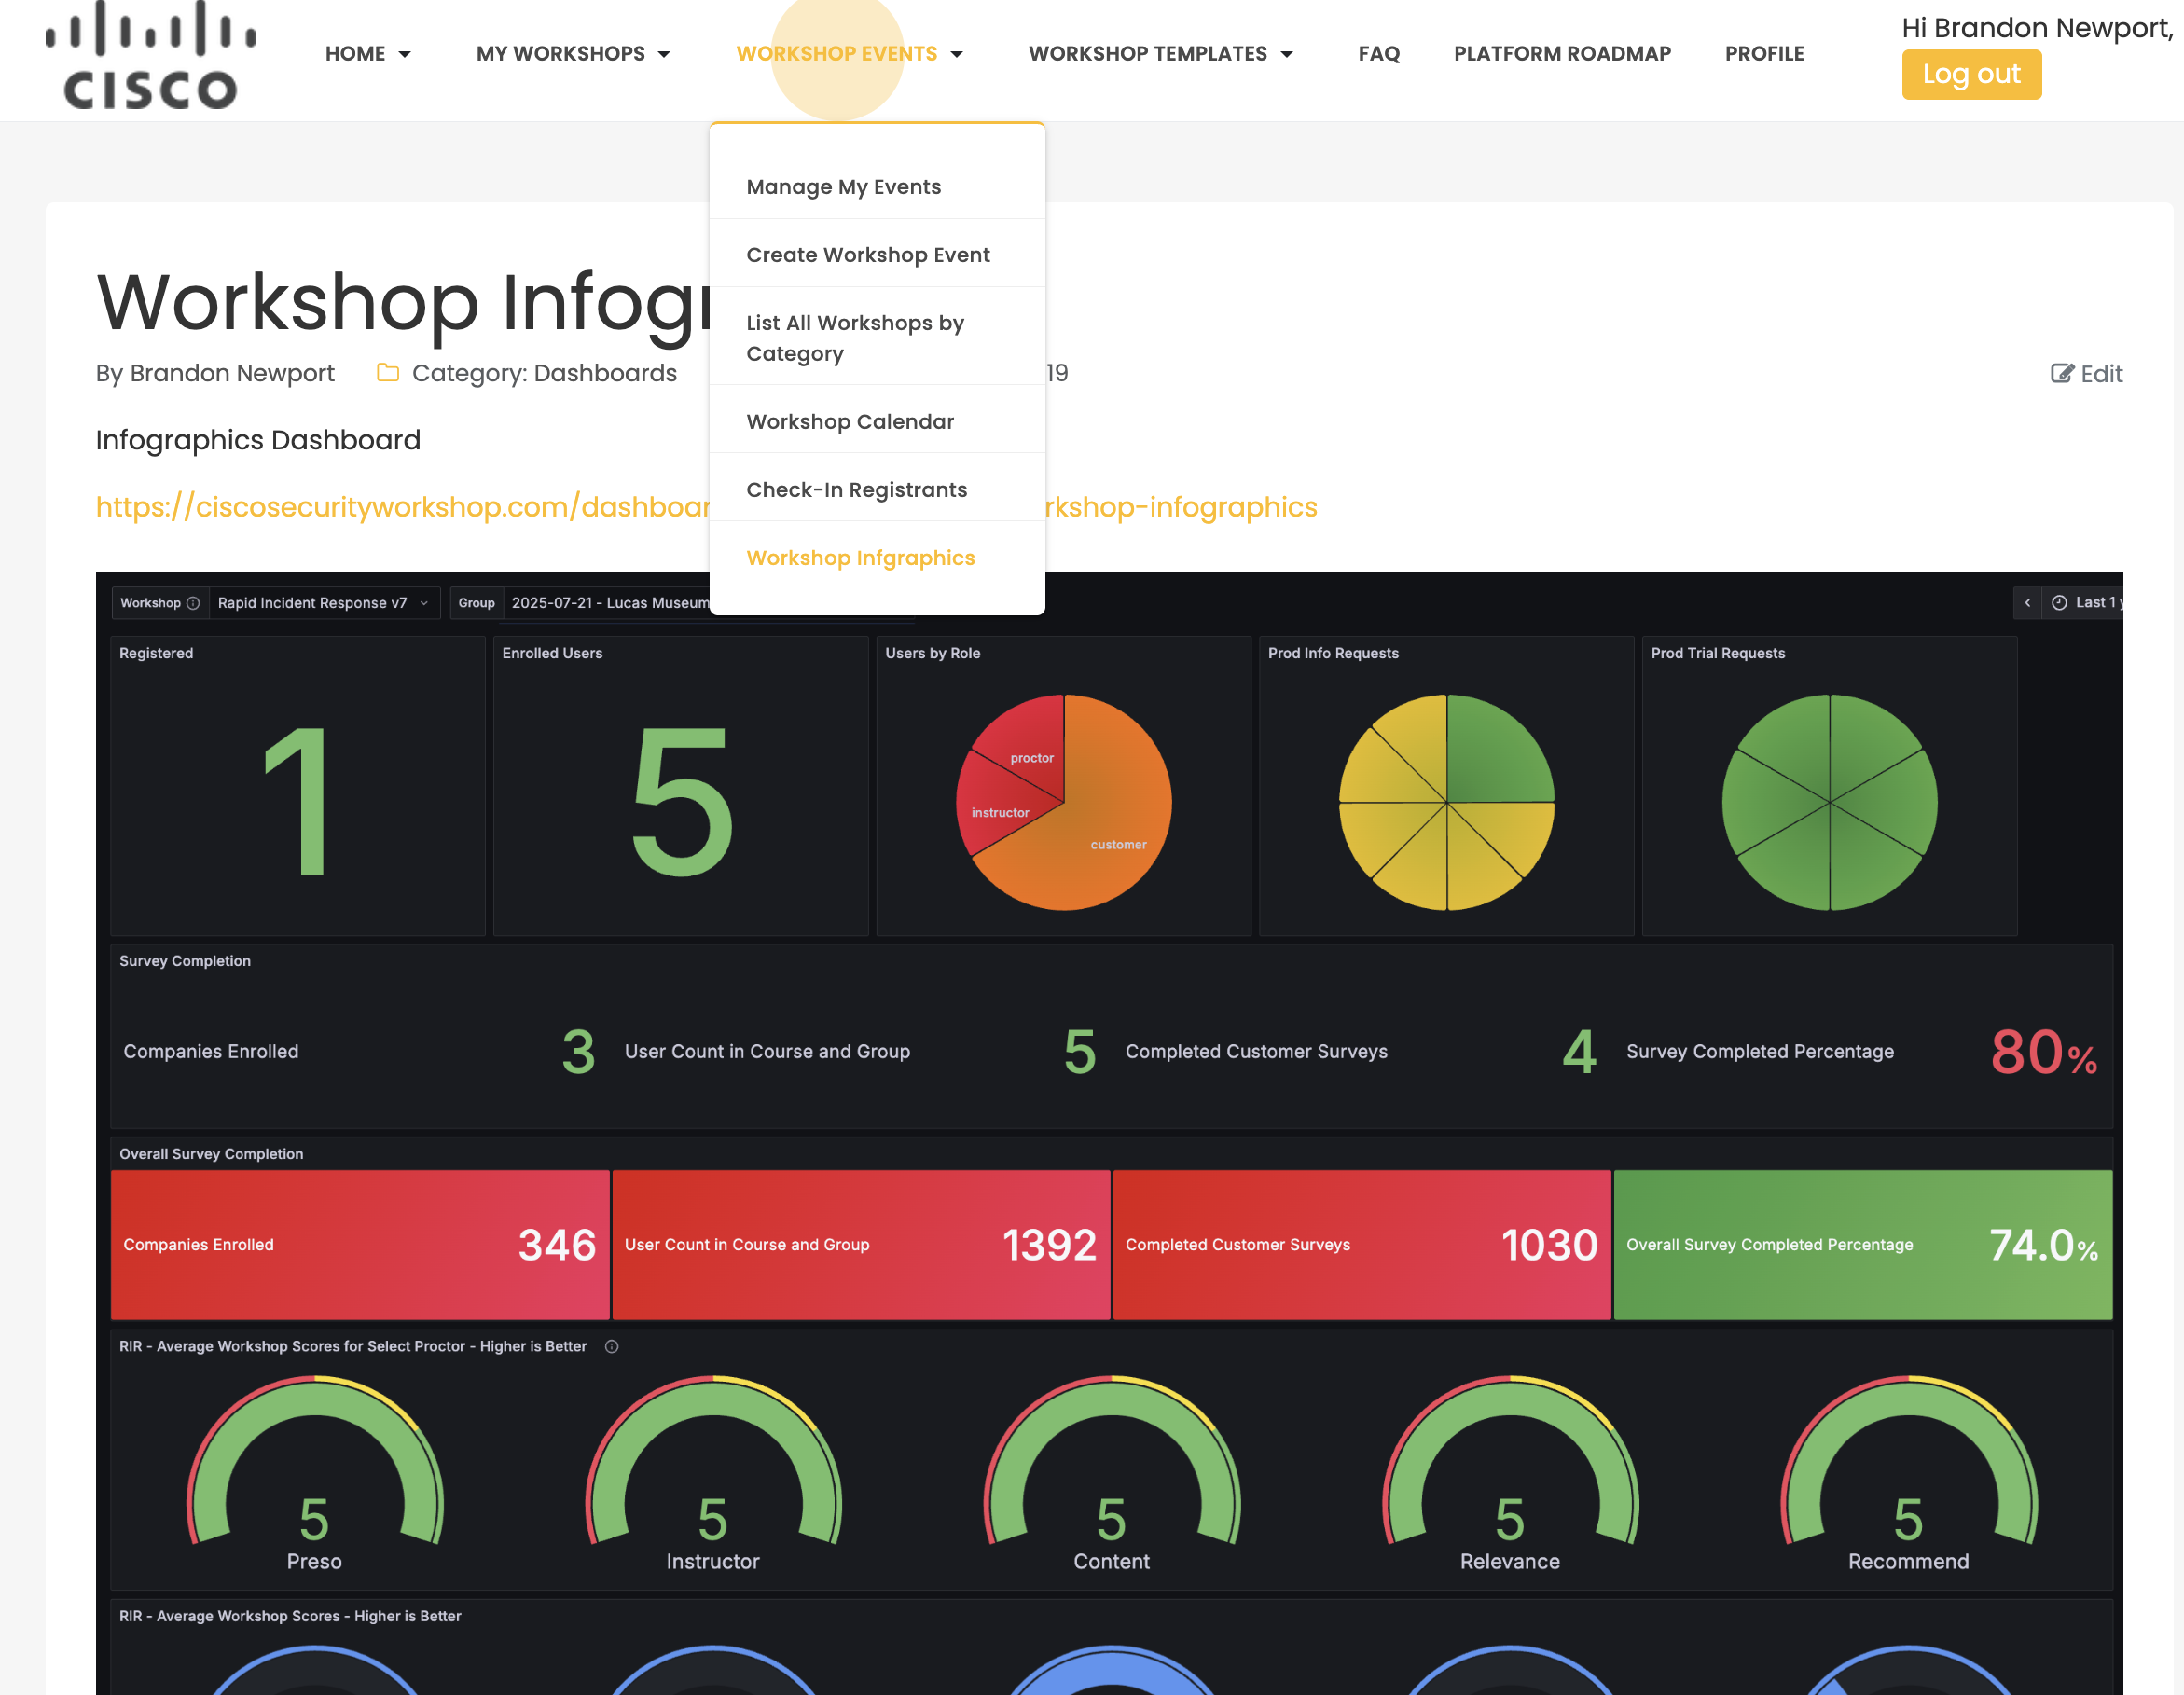
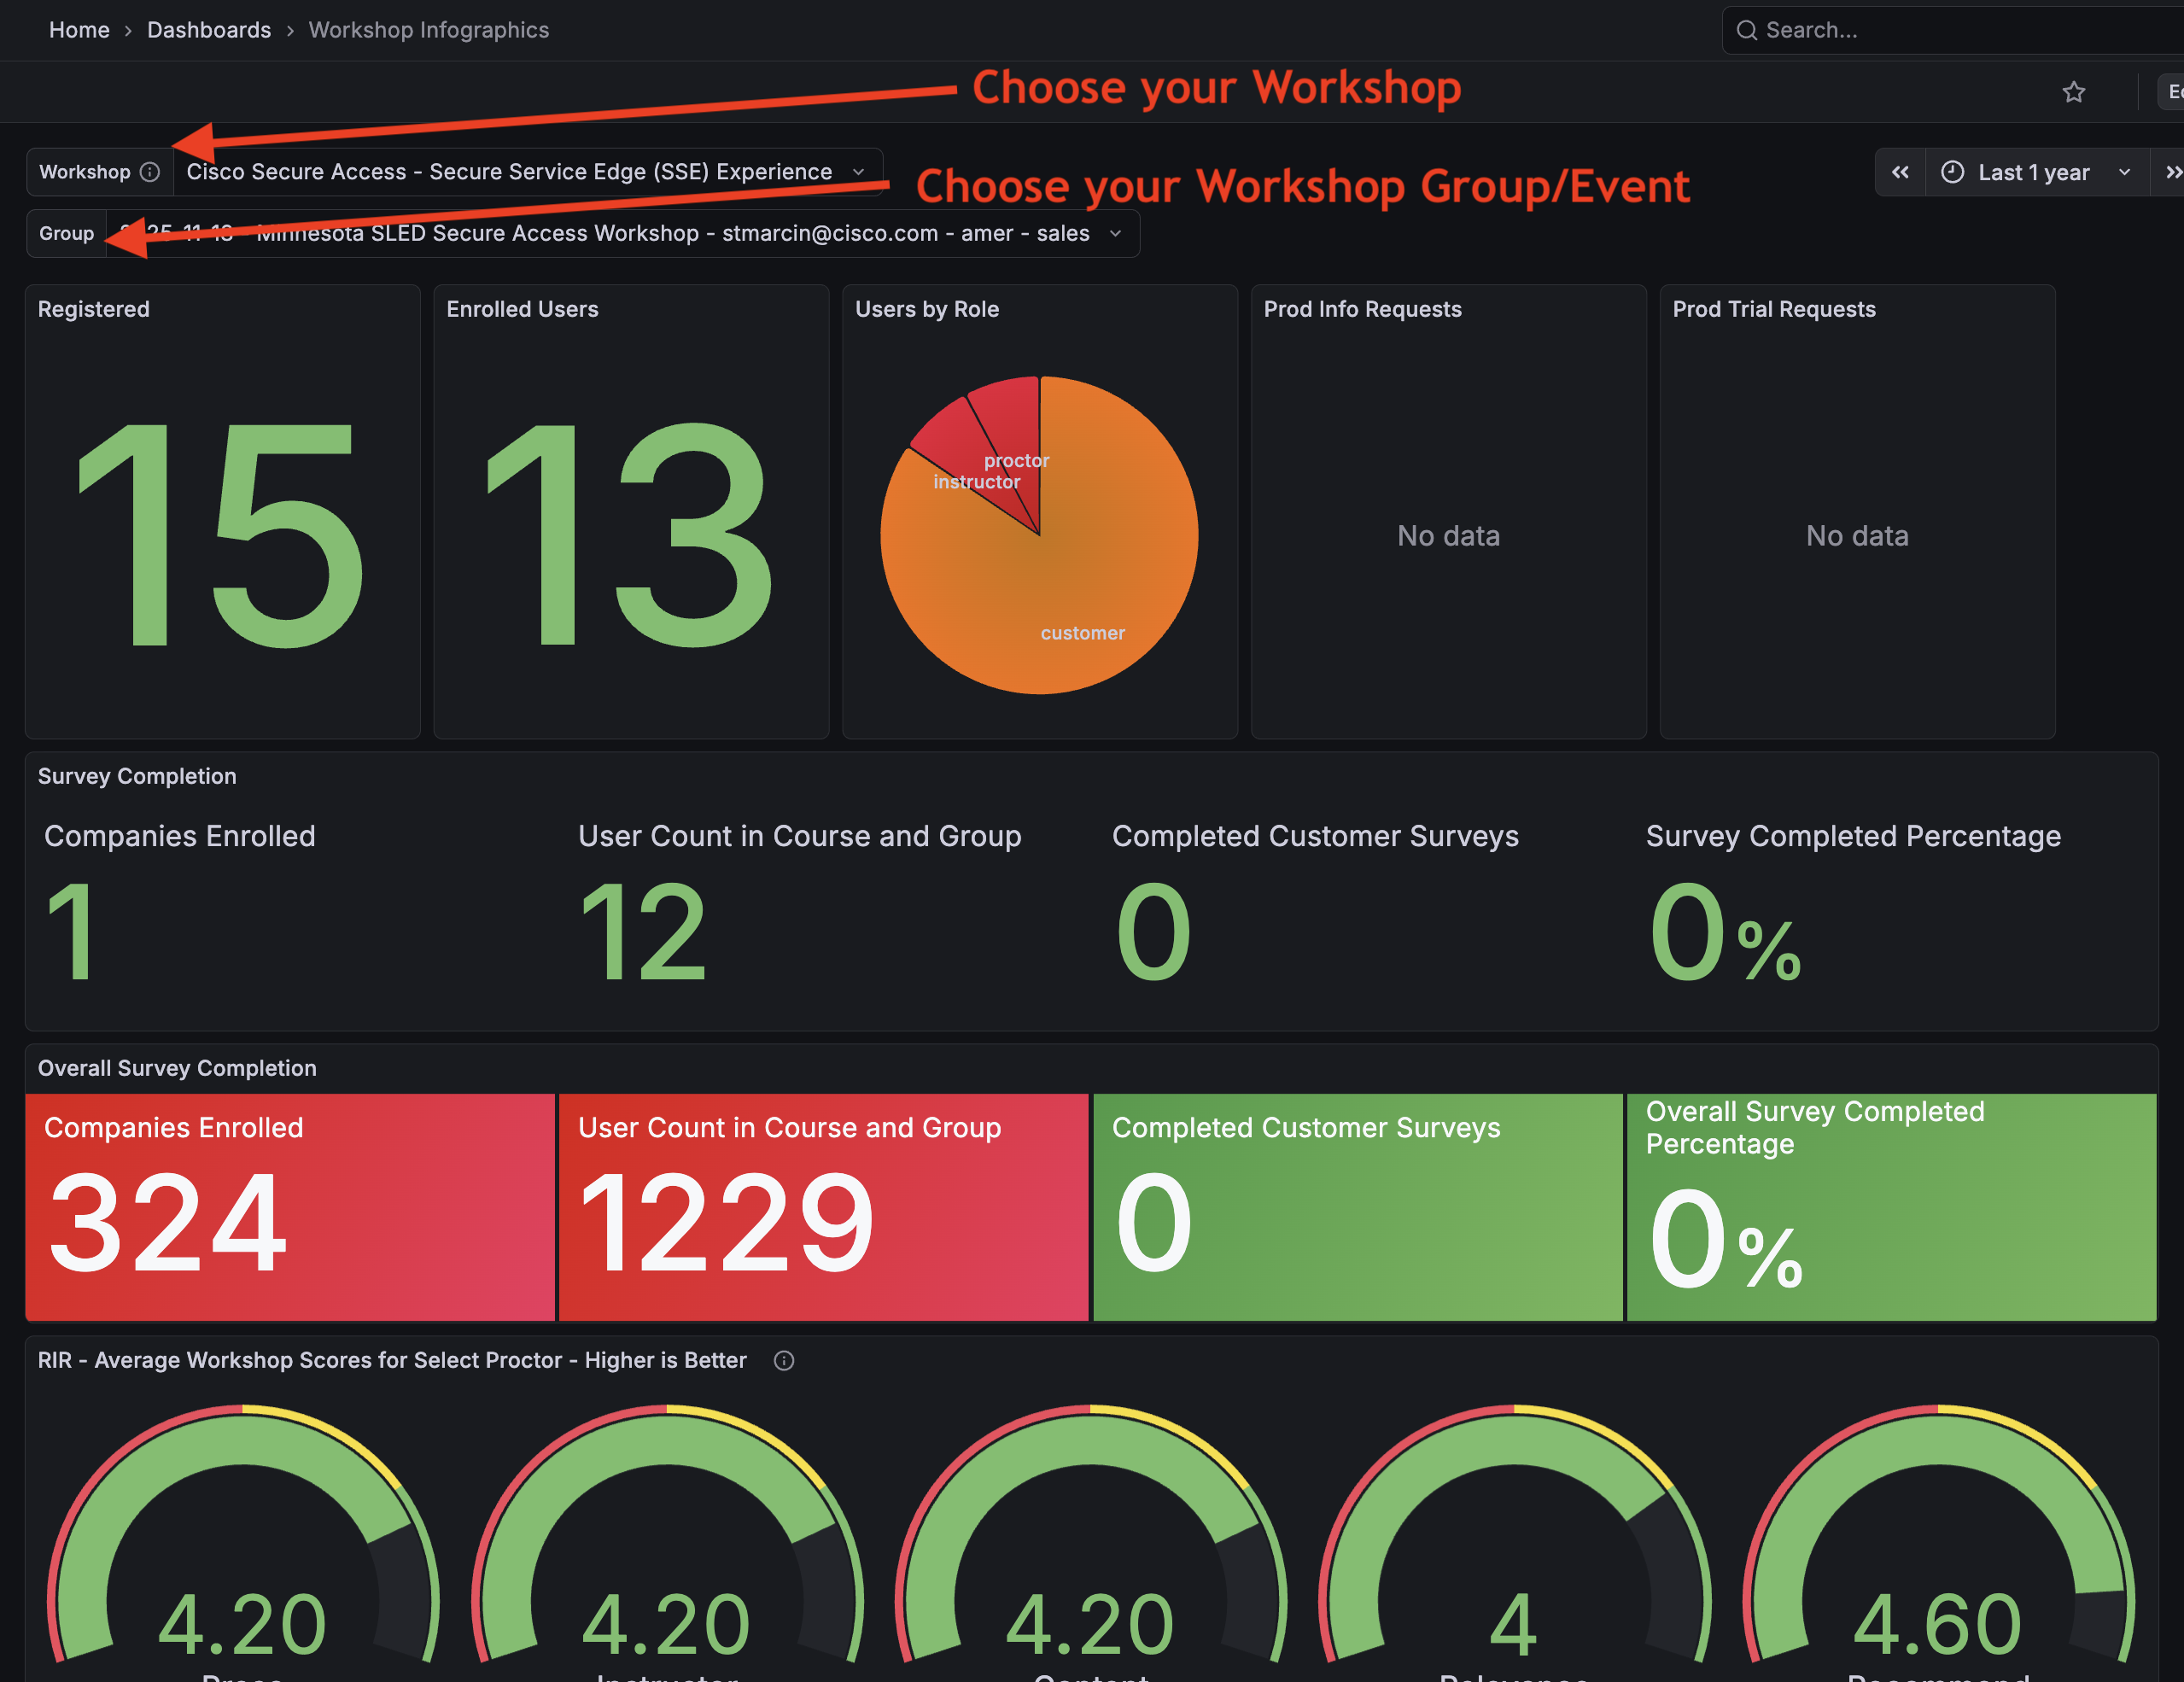
The "Workshop Infographics" page was created to streamline viewing the results of your workshop(s). Click "Workshop Events" in the menu, then Click "Workshop Infographic" or visit the following URL - https://ciscosecurityworkshop.com/workshop-events/workshop-infographics
To increase survey completion, please read the FAQ: How Can I Encourage Attendee Survey Completion?
- To see results. Filter on your Course/Workshop and the exact instance or Group Name. You will be able to see all the results from your workshop and how they compare to those from all other workshop events/groups for that particular Workshop.
To increase survey completion, please read the FAQ: How Can I Encourage Attendee Survey Completion?
Once attendees have completed the survey, you can see the results by completing the steps below:
Course Assessment Survey
- In the course scroll down to find the first survey (typically called Course Assessment). Click the link to get into it (click the name Course Assessment)
- In the blue menu bar near the top look for the link called Responses, and click it.
- Find the dropdown called Separate Groups, click the drop down and select your course group. Note you can ONLY see your course groups and no one else's groups
- You can now view the responses to the Course assessment on the screen. Note you will need to scroll right in order to see more of the survey results
- You can also download the result by clicking the Download table data as dropdown and selecting the format you wish then click the Download button
Product Information Request Survey
- In the course, scroll down to find the Product Information Request survey. Click the link to get into it (click the name Product Information Request)
- In the blue menu bar near the top, look for the link called Responses, and click it.
- Find the dropdown called Separate Groups, click the dropdown, and select your course group. Note, you can ONLY see your course groups and no one else's groups
- You can now view the responses to the Course assessment on the screen. Note, you will need to scroll right to see more of the survey results
- You can also download the result by clicking the Download table data as dropdown and selecting the format you wish, then click the Download button
Congratulations! You have successfully accessed and downloaded your workshop surveys.
Other Related FAQs:
- How Do I Invite Customers to My Workshop Event?
- What Time Zone Is Used When Creating Events?
- Why Do I Need to Give a Presentation?
- When Do Events Disappear from the Web UI?
- How Do I See Who Participated In My Workshop?
- Can We Have More Than One Proctor for Our Workshop?
- Can I Create a Private Event or Set Permissions on My Event?
- How Long Will It Take to Get Confirmation of My Workshop Event?
- How to Qualify as a Proctor
- What Is a Proctor and What Do They Do?
- What Happens to People on the Waitlist When My Event Is Full?
- How Can I Get Permission to Lead the Train the Trainer Sessions?
- How Can I Encourage Attendee Survey Completion?
- Details
- By Brandon Newport
- Category: Frequently Asked Questions
- Hits: 1354
Steps:
- In the top menu, select My Workshops.
*A new browser tab opens.* - Select the course (workshop) you want to review.
- In the right column, find the Completion progress block.
- If you don’t see Completion progress, contact the course creator or the Webex space for the workshop and ask them to add it.
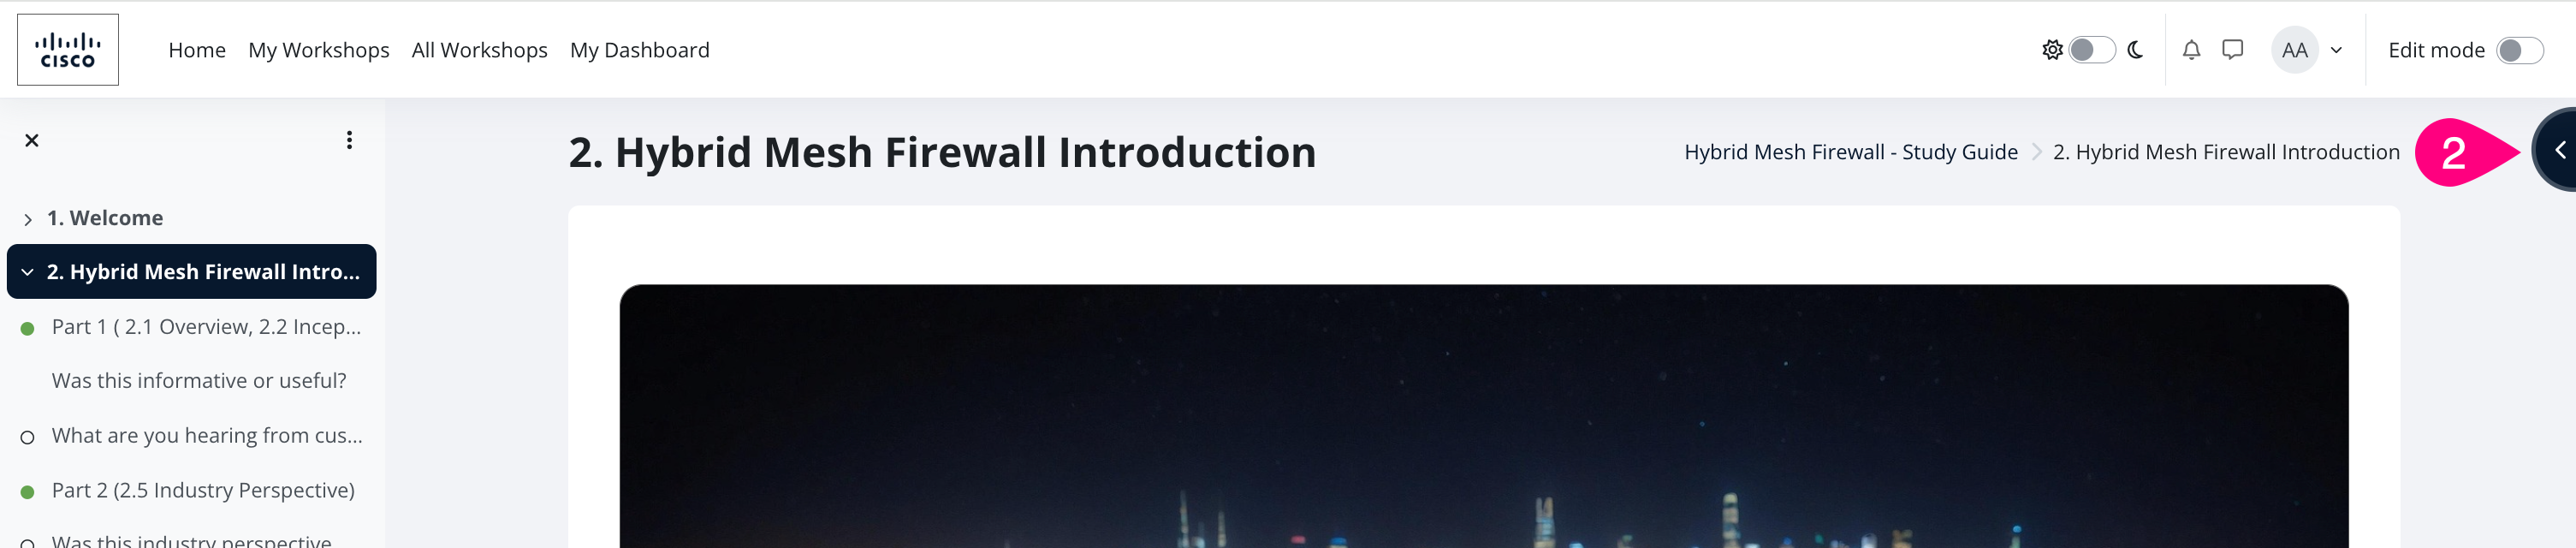
- If you are the proctor, select Overview of students in the Completion progress block.
*The Overview of students page opens.*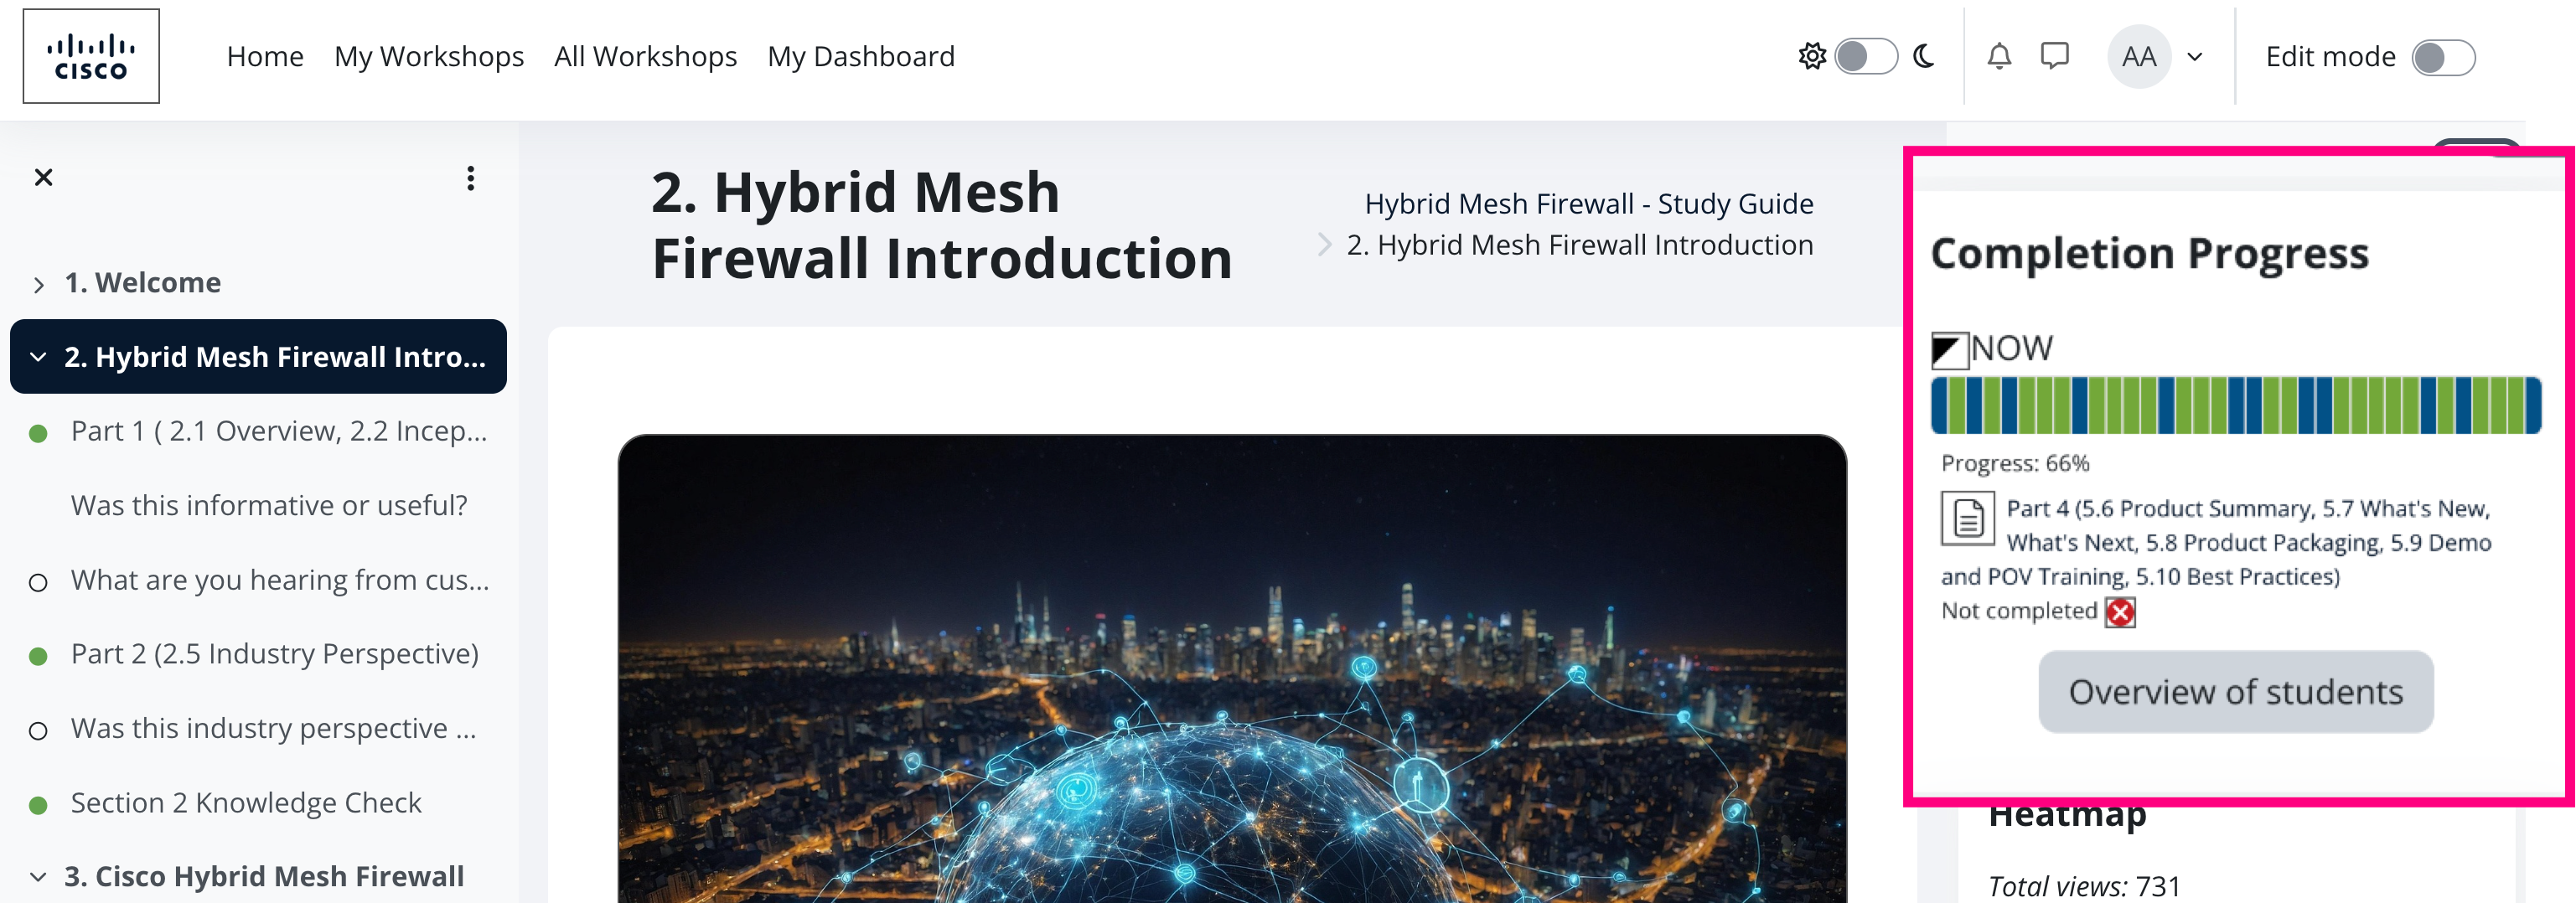
- In the upper-right area (under the second Overview of students heading), open Groups & groupings, then select the Workshop group you want to review.
- Select the role you want to view.
- For most workshops, select Customer.
- For most, this will be Customer, but if you look at other roles, it's because you are working with Partners or Employees (Cisco Internal).
- To include everyone (recommended), select All participants.
- For most workshops, select Customer.
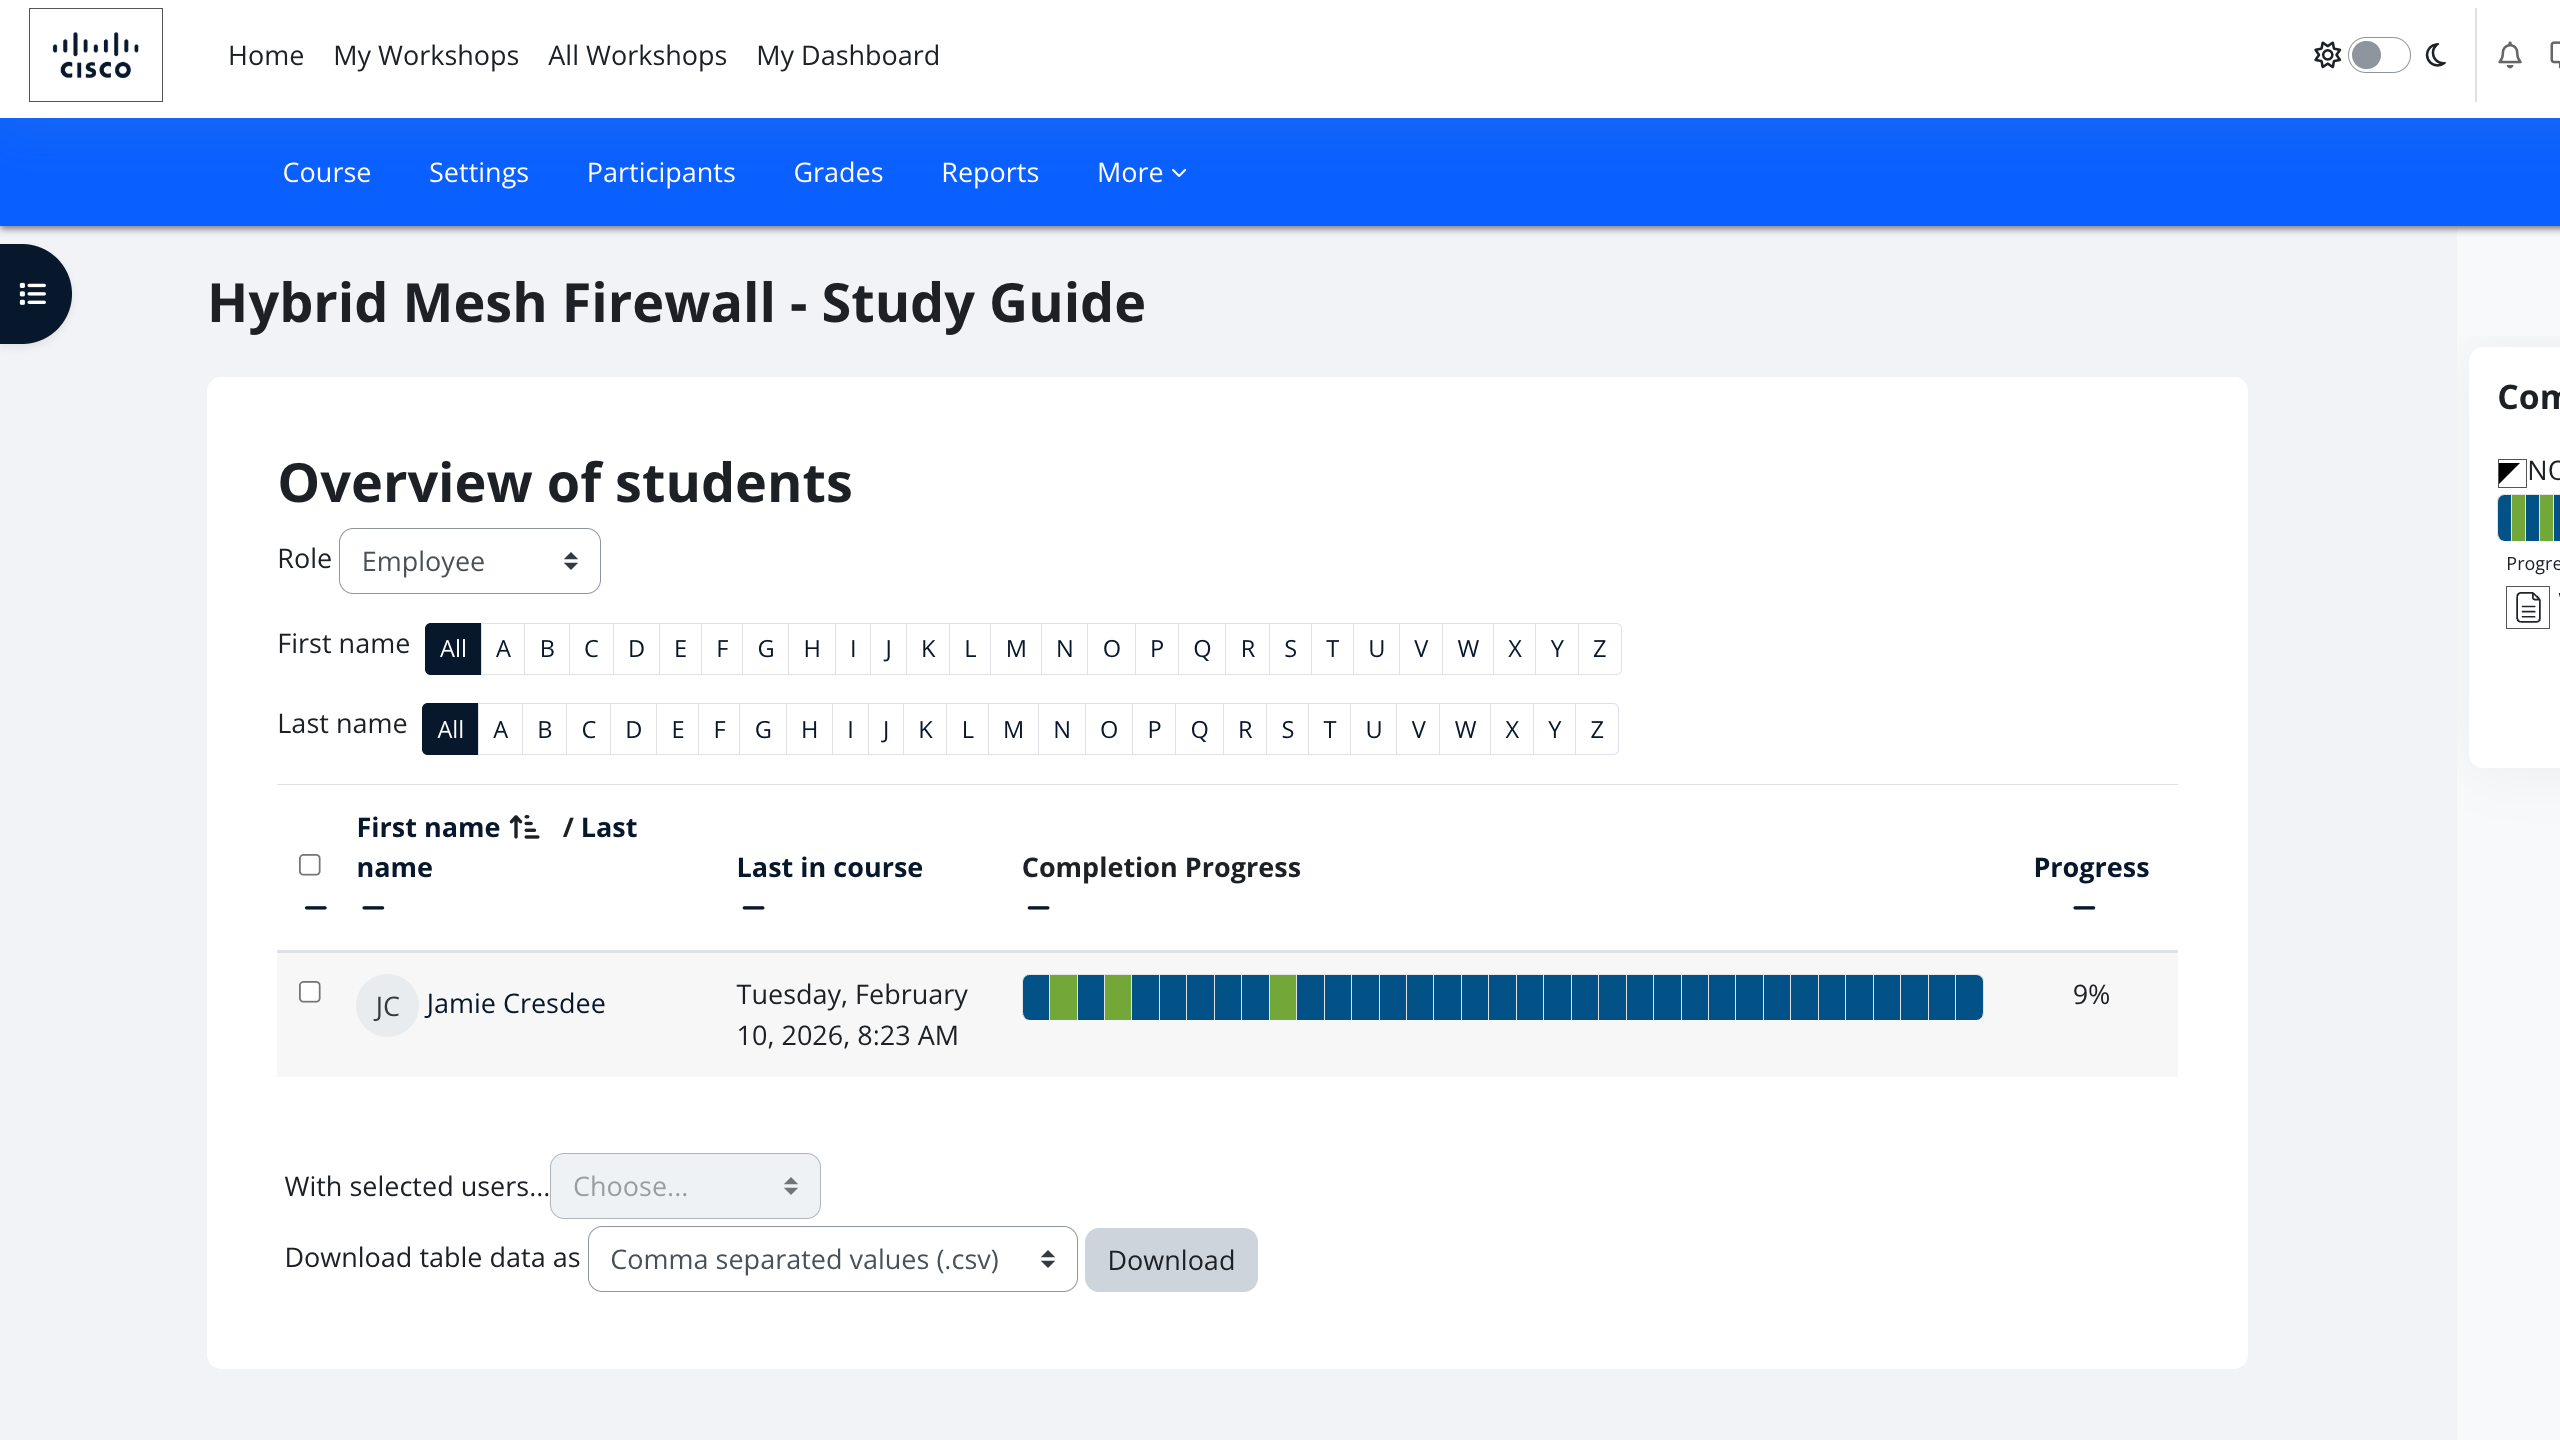
Result
- The list shows each participant in the selected group and their completion progress through the workshop.
- You can keep this page open during the workshop to monitor live progress.
Other Related FAQs:
- How Do I Check-In Attendees to My Workshop Event?
- How to Sign Up for Workshops Yourself [Enrollment Keys]
- How Do I See My Survey Results?
- Will the Template Replace My Description?
- How Do I Invite Customers to My Workshop Event?
- Why Do I Need to Give a Presentation?
- When Do Events Disappear from the Web UI?
- Can I Change the Proctor for My Workshop Event?
- Can We Have More Than One Proctor for Our Workshop?
- Can I Create a Private Event or Set Permissions on My Event?
- How Long Will It Take to Get Confirmation of My Workshop Event?
- What Happens to People on the Waitlist When My Event Is Full?
- How Can I Get Permission to Lead the Train the Trainer Sessions?
- How Can I Encourage Attendee Survey Completion?
Page 5 of 6
